Warning: Undefined variable $show_stats in /home/jdqespth/public_html/wp-content/plugins/stats/stats.php on line 1384

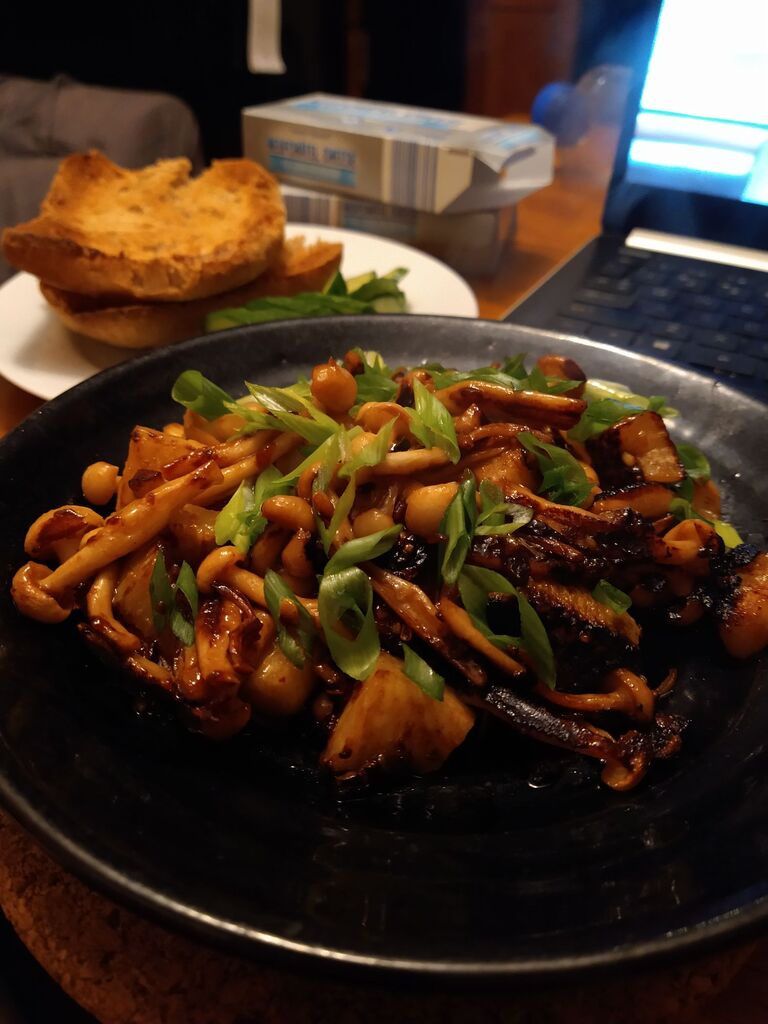
Mushrooms and Radish in a soy butter glaze

These mushrooms have been 99 cents lately, and I’ve been buying them for mille feuille nabe but I haven’t felt like making that this week, and I wanted to make sure I used them before they went bad.

And I had half a diakon radish left in my refrigerator and had not bought more, but I signed up for a delivery of mystery vegetable seconds and there three (smaller) radishes in that package. So it was time to use this one up, too.

The Yummy Vegan had a dish that used both. I mean, it mostly seems to average out radishes by OkonomiKitchen and mushrooms from The Woks of Life and then makes it vegan. And more importantly uses only one pan for them both!

I liked the concept, but switched the order. So I started off cooking the seafood mushrooms in a little bit of real butter. And at the same time, I quartered and thickly sliced the rest of the radish and put it in a glass bowl (with a vented lid) with some sake and mushroom powder for two minutes. It still wasn’t quite soft at two minutes, so I stirred everything around and microwaved the radishes for another minute.

Meanwhile I cooked the mushrooms until they were very brown and then removed them to a plate. Then I melted another 2 Tablespoons of real butter and put the radishes in to shallow fry.

I made the sauce by using the amount of miso I had left in the jar, which was only about a tablespoon. And I also only added one teaspoon of soy sauce because adding salt to salt, especially since I use salted butter, sounded like a lot. So to get the liquid amount right. I used more like a quarter cup of mirin and no sugar. And the recipe said you might need to add water, but I had some clementines in the counter, so I added the juice of one. And then much careful stirring to fully dissolve the miso without splashing the liquids.

Once the radish was nicely and evenly browned, I added the mushrooms back in and poured the sauce over both of them together.

Finished with some sliced scallions on top.

The result was very good! And, yes, I ate it with a toasted philly muffin, with cream cheese and sliced cucumber, instead of rice. They went very well together.

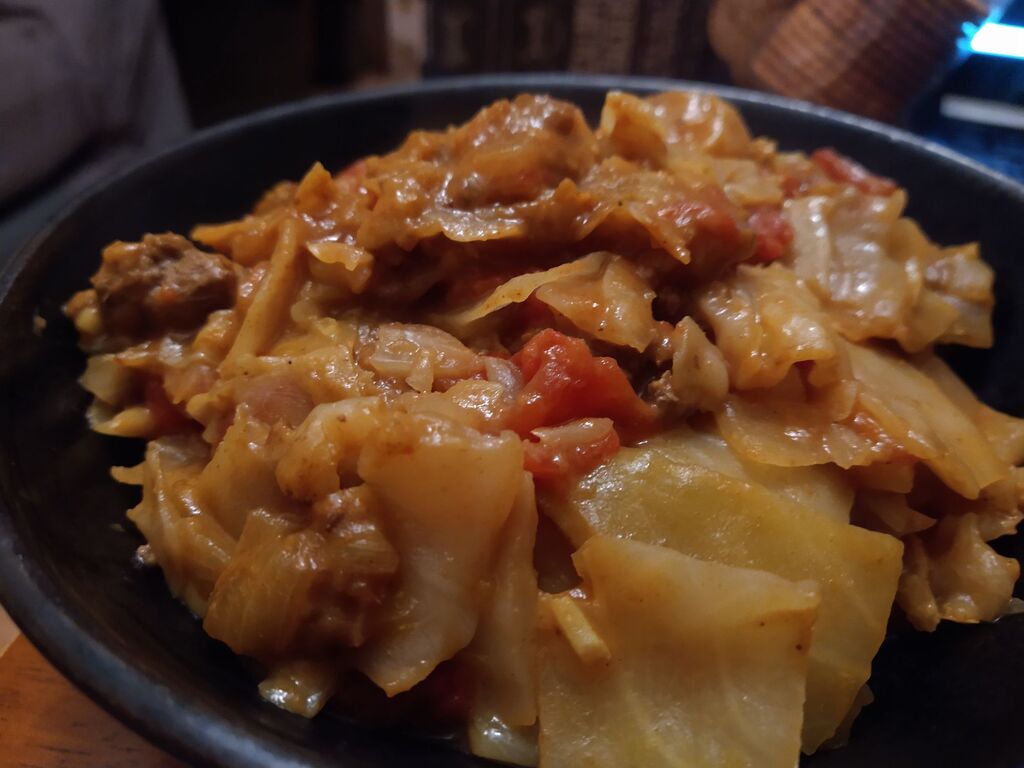
Comforting Cabbage and Ground Beef … Casserole?

I mean, it has all the makings of a good casserole. It just needs some egg noodles and a casserole dish. But I guess making it for just me it’s more in the “skillet” category.

Plated final dish with a saucy mix of cabbage and minced beef

So I had roughly diced and boiled a head of cabbage, and I still had about a pint of leftovers from that.

I also had half a can of diced tomatoes left from making shakshuka. Ground beef was what I’d thawed. I don’t know if I’ve mentioned before, but when I the a pound of ground beef, I usually split it into quarters and use one loose for that day’s meal, and I make the other three quarters into hamburger patties and refreeze them.

So this was my starting point, and then I went to see what other people online were doing with these ingredients – and the results were almost universally soup. I was not feeling like soup. So this is winging it.

I started off browning the meat with some onions and diced serrano peppers, and then I minced and added three cloves of garlic.

There’s some “tagine spice” in my cabinet that a friend brought me back from France. It smells more like a sweet curry powder than a ras el hanout, so it feels weird using it in either context. But this seemed like a great reason to use up a tablespoon or so. And then I added about a tablespoon of flour and stirred everything well until all of the flour was sticking to the meat and had cooked a bit.

And then I added liquids – the leftover canned tomatoes, some nut milk, and I decided to count the cabbage as kinda liquid, too. After stirring everything thoroughly, I made sure everything came to a boil to cook the starches. And then I stirred it again and let it simmer until most of the water had evaporated and the sauce was very thick. I did have a moment of my ancestors (well, my mother) telling me that this dish needed a dash of Worcestershire sauce, but I don’t have any, so ancestral advice was ignored. But if you’re inspired by this, it probably wouldn’t hurt to add some.

Re: nut milk – I had impulse bought some pistachio milk (unsweetened!) because I’d never seen it before, and Even though it’s delicious and fancy, it’s always a struggle getting through that much of any kind of milk before it goes bad. So I was delighted I found an excuse to use it, too!

It was delicious! I was so full!

n-layer dip for dinner

A plate full of dip

It’s hard cooking alone to go through an entire can of refried beans in one sitting, and I happened to have about 2/3 of a can left.

So the bottom later on this plate is about half a can of refried beans (yes, your math is correct, there will be more beans in my near future). I microwave it for about a minute. Then when I was stirring the beans, I also mixed in some fresh diced serrano pepper. And then it got microwaved for another 30 seconds.

The beans got topped with a layer of salsa (chipotle-flavor generic salsa from Aldi’s that I thought would be comparable to Giant’s, but it was not as good)

Above that – I had peeled and diced (slightly smaller than a centimeter dice) a small sweet potato. That was sauteed in oil for a few minutes, and then I added a diced half onion (white in this case, but whatever color). Near the end when I was pretty sure all the potato was cooked through and was just adding color, I added two minced cloves of garlic and Penzeys Southwest seasoning. Once the garlic was cooked and the potatoes had some brown edges, it became the third layer for the dip.

Then I minced some scallion greens and some parsley to top the sweet potato layer.

I finely diced (because I didn’t want to wash the shredder) some sharp cheddar cheese. Once that was on top, I popped the dip back in the microwave for another 40 second to get the cheese a little melty and the layers playing together.

I had a container of beet & cabbage shred in the refrigerator, and that was a good choice for the next layer.

So the seventh later was shredded lettuce. And then I had some strained yogurt that was more over to the side than an actual layer.

And I ate it with a fork and some tortilla chips.

Stuffed Shells

One of the more pedestrian comfort foods. I was making this for a friend, and realized that even though this is not a dish I make frequently (maybe once every 8 years or so), I have strong opinions about it.

My strong opinion: Why so little flavor?

So let’s start with the filling.

Let’s start with the eggs in the filling. I never notice them, they don’t seem to provide much structural support, and they make your cooking/reheating slightly more complex than just – assemble and heat until hot enough you’d be happy serving it. So I don’t use them. Your mileage may vary.

But you should totally have other things in there. Other green (but not watery) things! For a pint of ricotta, there should be at least 2 scallions – sliced thinly all the way up including the green parts (but not any dried tips, let’s be real). There should be a huge amount of parsley (a fluffy pile of minced leaves that looks to be about the same volume as half your amount of ricotta). You have a mix of dried italian herbs? Throw a bunch of that in the filling. You have fresh basil? Mince and throw in maybe as much as a fluffy pile of 1/4 the volume of your container (I don’t know – it depends how flavorful your plant is – go by what smells good to you). Mix that together. Taste. Add salt. Maybe add pepper. Mix again.

Some people add spinach or chard to the recipe. Either have a delicate hand with the fresh leaves, OR cook the leaves first, press very dry, cut up finely, fluff with your hands, and stir in thoroughly making sure you don’t have clumps.

So now you have your filling.

Let’s fix the pasta – take any old box of dried pasta shells. Boil the water, pick out just the intact shells to throw in (a few more than you’ll actually need because a couple usually tear while cooking), and cook for the package directions. Most dried pasta has a range of times depending on how firm you want it, but jumbo shells boxes usually just have the time for ‘pretty darn firm’ because they know you aren’t eating them straight away – people only make them for stuffed shells. And then once they are cooked and drained, rinse them in cold water (so they stay firm – and in this case getting the surface starch off will benefit you by having them less likely to stick together and tear)

Now you get your casserole and your sauce. I just use jarred sauce. You can have your own sauce opinions.

Spoon a little bit of the sauce into the empty casserole dish and spread around.

Grab a shell, stuff it with the ricotta (you get to balance your ricotta/shell ratio based on your preferences and relative amounts of materials), and lay them out in a single layer on the pan. Again, you get to choose how orderly your layout might be.

Once you have all the shells in the casserole dish that you want to have (this works best if you have chosen a dish sized to have the shells fit fairly firmly together inside, but still all in a single layer). And pour more sauce over it. Because I am not a fan of crunchy pasta (I know people who are, so not judging), I make sure to spread the sauce to get all of the pasta surfaces at least a bit wet and red even if they aren’t buried fully in the pasta sauce.

If you have it on hand and are feeling the gooey cheese, sprinkle mozzarella on top.

(If you have a casserole dish with a lid, you can totally freeze this right now)

Bake at any temperature (250F-375F) until the dish is as hot as is aesthetically pleasing to you. I go until the cheese on top is bubbling and maybe browning in a couple spots. (If frozen, make sure it’s warm throughout before caring about the condition of the topping – that might mean thawing ahead or not using the highest heat you possibly can)

Serve and eat. Enjoy!

Ova Elixa – Eggs dressed with fish sauce

This is another Roman recipe. I made it for Noisemakers IX.

So a lot of SCA events just have a bowl of hard boiled eggs in the shell – pretty much for people to fill up on when they aren’t adventurous for weirder dishes. So I found a recipe that would make hard boiled eggs one of the adventurous dishes.

These were served cut into quarters and already drizzled with the sauce, and a side pitcher so you could add more sauce, if desired.

Ova Elixa: liquamine, oleo, mero vel ex liquamine, pipere, lasere – Apicius VII, xix.2

Boiled eggs with a sauce containing fish sauce, olive oil, red wine, black pepper, asafoetida

So for the fish sauce, I ended up being convinced by my favorite cheese mongers to try BLiS barrel aged fish sauce. And I chose this dish to use it on because I thought the woodiness and the eggs would go well together.

We strewed the plate with baby arugula so the eggs wouldn’t shift in transport from the kitchen to the buffet.
The pitchers with the sauce were made by Brunissende.

And this was at the very start of the buffet so that it would be like the sources in a Roman dinner party – from eggs to nuts – but I forgot to put out the nuts in the end.