Warning: Undefined variable $show_stats in /home/jdqespth/public_html/wp-content/plugins/stats/stats.php on line 1384

(vegan) Saniyet Batates

(this post doesn’t start vegan, but keep reading to the second attempt!)

I’ve been taking a class on food and culture in the Islamic Middle East, and my assigned country to research is Egypt. As part of this, I’ve been looking at Egyptian cookbooks.

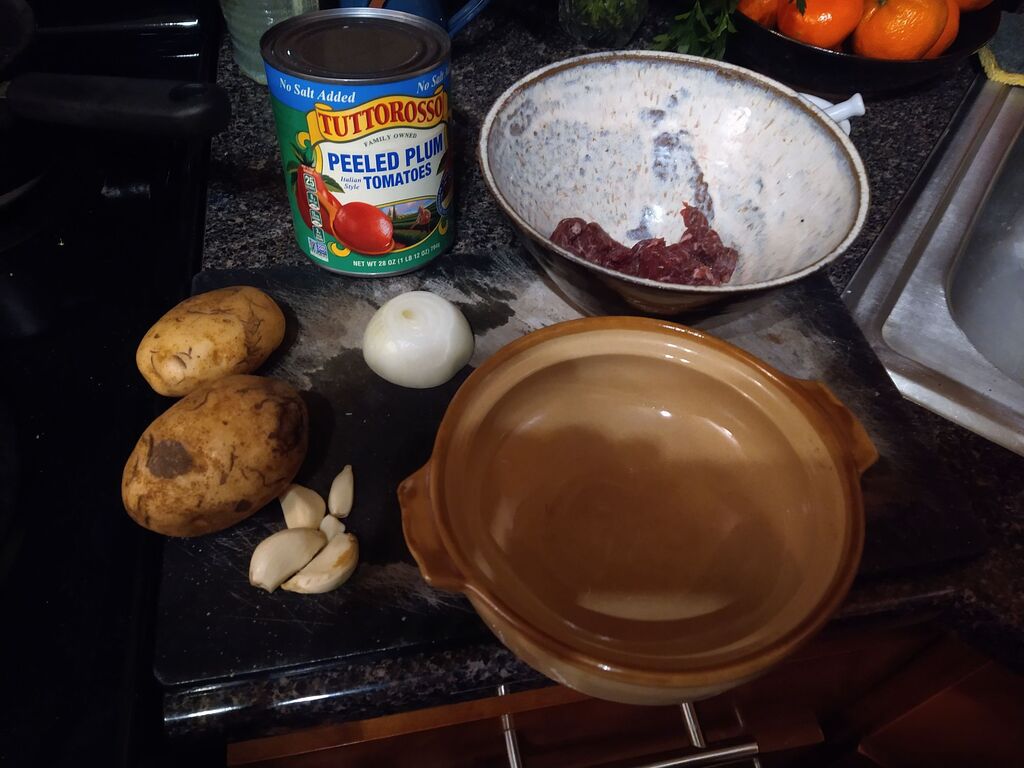
I started with Egyptian Cooking: A Practical Guide by Samia Abdennour, published in 1984 by the American University in Cairo Press. It looked very sensible and traditional with bare bones recipes and no pictures. The cookbook inspired confidence that this is recording traditional cooking. There were 2 versions presented: one with veal and the other with beef, but all of the same ingredients and quantities for both. I figured I would give it a try.

Here are the recipes as published in the cookbook:
MC 180 SANIYET BATATES, NAY FI NAY – Casserole of potatoes (1)
1 kg potatoes, peeled and sliced 2cms thick
1/2 kg beef
4-6 ripe tomatoes, peeled and chopped coarsely
12-15 garlic cloves, halved diagonally
2 onions, sliced thinly
2 cups tomato juice
salt and pepper

Cut beef into bite-sized cubes. Put all the ingredients together in an oven pot, cover with seasoned tomato juice and cook in preheated moderate oven for 1-2 hours.

MC 181 SANIYET BATATES – Casserole of potatoes (2)
1 kg potatoes, peeled and sliced 2cms thick
1/2 kg veal
3-6 ripe tomatoes, peeled and chopped coarsely
12-15 garlic cloves, halved diagonally
2 onions, sliced thinly
2 cups tomato juice
cooking oil
salt and pepper

Peel and slice potatoes 2cms thick. Cut veal into small cubes. Peel and chop tomatoes coarsely. Peel garlic and halve diagonally. Slice onions very thin, keeping all items separate.

Saute onions, add tomato juice and cook for 10 minutes. Add [meat,] garlic and seasoning and cook for another 10 minutes.

Arrange sliced potatoes in lightly-greased oven dish, bury the meat mixture among the slices and cover with the cooked tomato sauce. Bake in slow oven for about 1 hour.

Now I didn’t have a full kilogram of potatoes handy and was only cooking for 1 person, so I scaled the recipe down a bit.

mise en place with an empty donabe, 2 sad potatoes, 5 peeled garlic cloves, 1 small peeled white onion, 1 can of peeled plum tomatoes, and a bowl with small cubes of beef

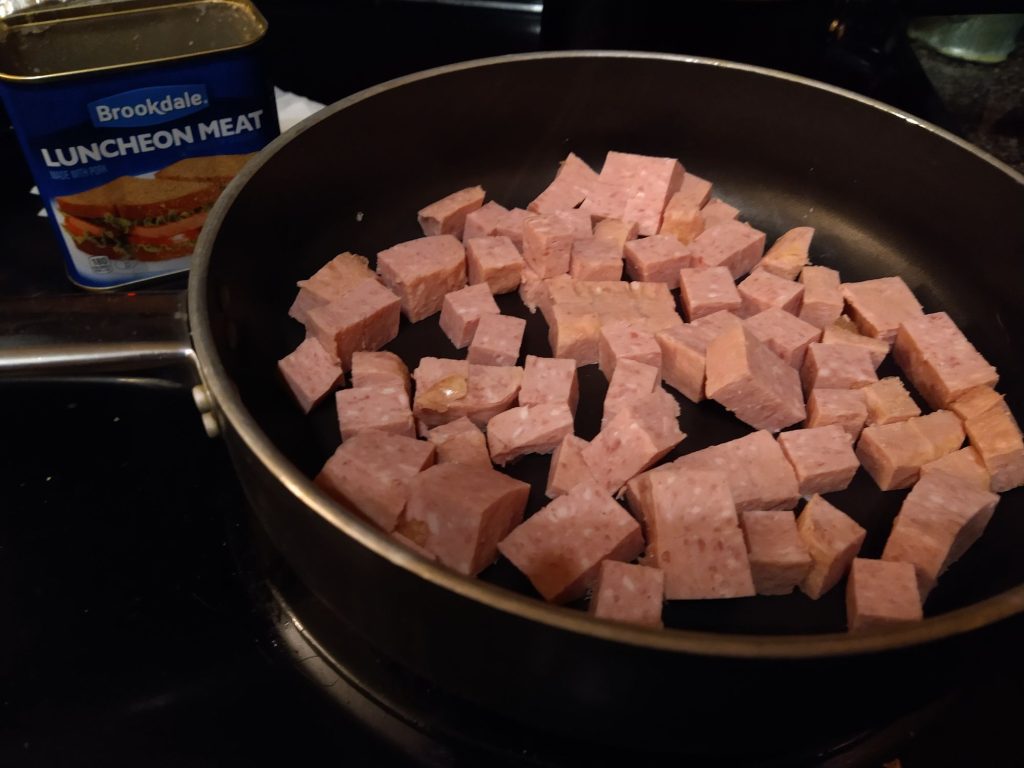
I had 2 russet potatoes that were not in great shape. (I had purchased them on delivery instead of looking them over in the store, and this batch was damaged. The delivery place gave me a full refund for the potatoes after I sent them a picture. Then I split up the bag with a few people so we could use them up before they went off. So I washed them and peeled them and sliced them into thick rounds and put them in the casserole dish. And this is where I had my first misgivings – when I’m building a dish like this, I usually like to put the onions between the bottom of the dish and the main meat (or in this case potatoes) so that there’s less worry about sticking and burning. But we’re trying to follow the recipe here!

Donabe filled with potatoes with small beef cubes tucked all around and thinly sliced onions on top. There are also garlic slices in there, but none are showing in the picture.

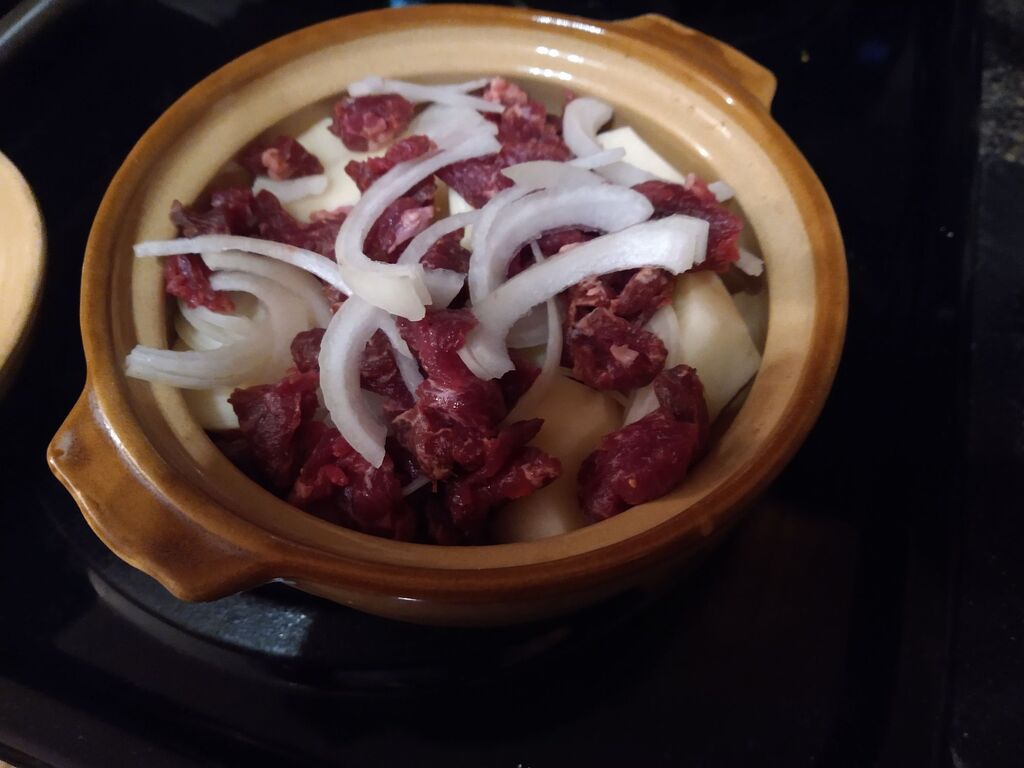
Once I had a solid layer of potatoes in there, I started tucking the garlic pieces and the small beef cubes around the potatoes. And then I (foolishly!) decided to not get another pan dirty by precooking the onions in the tomato juice, like in the second recipe, and just add them directly the way the first recipe says/implies. I added the tomato juice from the pan and sliced some of the tomatoes on top. Then it went in the oven!

donabe with a cooked dish with potatoes in thin liquid and you can see the other ingredients – tomatoes, beef, and onions – looking a little dry and cooked with some small amounts of burning, especially right around the edge of the bowl where liquid bubbled up the sides.

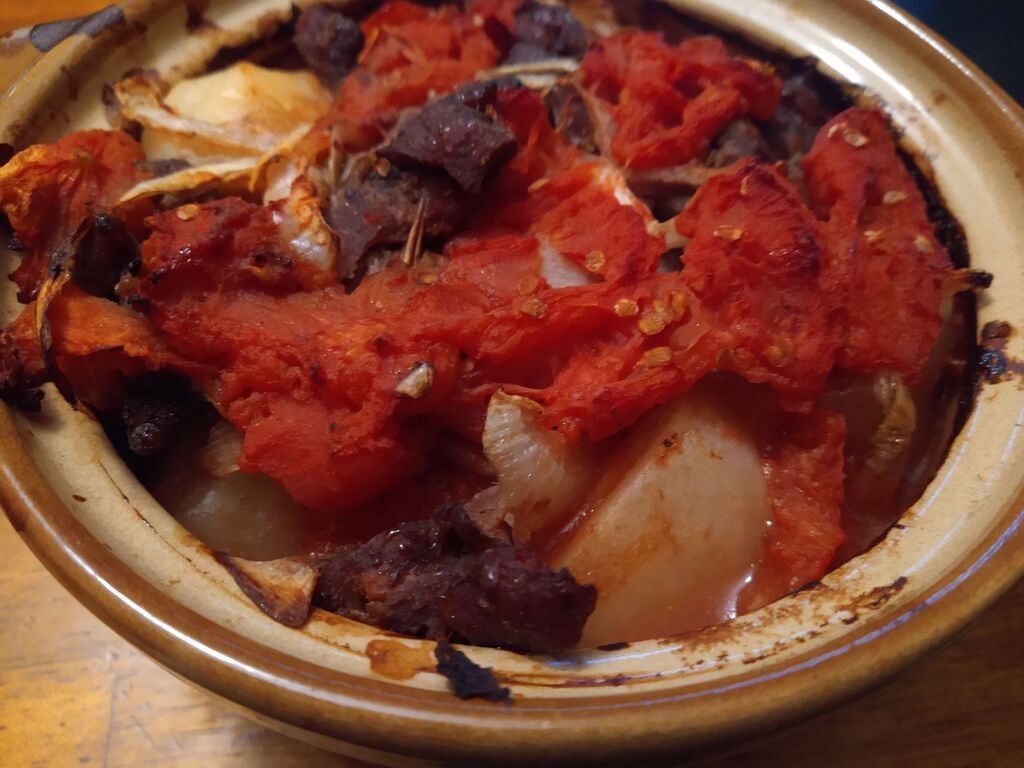
After about an hour and a half, it was smelling pretty good and like food, so I gave the potatoes a poke with a fork – they were still fairly firm, so back they went for another half hour. Then I waited for the potatoes to cool enough to eat and I was very optimistic about this dish.


It was terrible! The potatoes might have been cooked, but they were not soft and none of the sauce had penetrated to flavor the potatoes. And the onions! I don’t know how, but the onions tasted even more strongly of raw onion flavor after cooking than they did before! Nothing went together and it put me off of using that whole cookbook!

But this should be a viable dish! It sounds so simple, stable, and reliable. So I went looking to see if it appeared in other cookbooks. Of the ones I checked, nothing particularly close appeared.

And then I found a food blogger with a VEGAN version! https://cheznermine.com/2026/03/27/authentic-egyptian-potato-bake-saneyet-batates/

screencapture of the start of Chez Nermine’s page about Saneyet Batates – site linked to picture if you want to click through

And this was more like it! With detailed instructions, discussions about ingredient varieties, and even a video recap. So this time I made it for lunch with a friend. She has been having chemo on Friday afternoons and then I’ll pick her up and make a meal before the nausea kicks in. It has all of the fun of dining out with none of the risks of dining in public while immunocompromised. So I asked her opinions about the ingredients, and she asked for minimal garlic and onions and that it not be particularly spicy, so those are the big changes here.

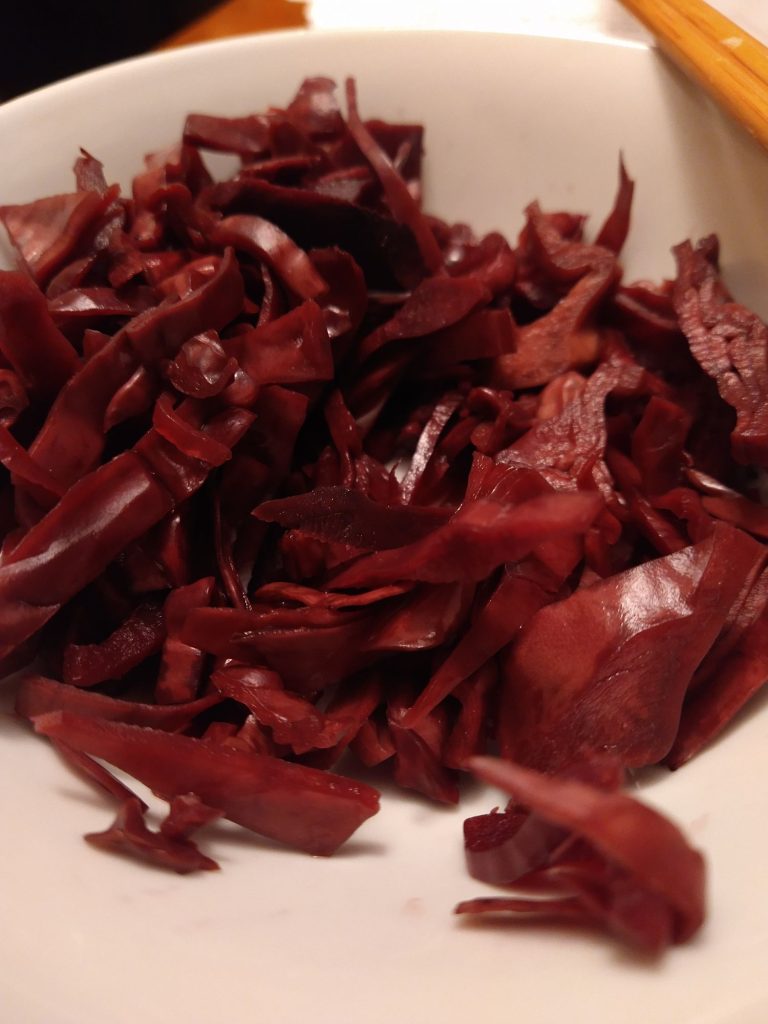
Using an 8″x8″ casserole dish, I started with some oil in the base. And then I added about 1-2 Tablespoons (not measured, just was left in the container I had) of dried shallots (to replace the fresh onions) and the spices – this version called for spices, so that’s exciting – ground coriander (the last one the ones I dried from my 2025 garden), ground cumin (from the Egyptian cumin a former couchsurfer had brought me!), dry oregano (also dried from my garden), and a generous sprinkle of paprika (a little more generous than the recipe because I’m trying to use up that container). And then that got kind of mixed together.

This time, I was using a fresh bag of yukon gold potatoes. Even though the directions say to slice one inch thick, looking at her video I decided to slice them closer to half an inch thick. And then I sliced up some fresh bell peppers without any spiciness to them. That gets tossed with the spices to distribute as evenly as possible.

I still used the same kind of canned whole tomatoes, so I first poured out some of the liquid and mixed it with tomato paste and vegetable soup base. Then I sliced the tomatoes on top again and poured the enriched liquid over everything. The whole large-sized can was perfect for this size casserole dish.

And then I cooked it – first on the stovetop and then in the oven. But for much longer than called for because my friend’s appointment ran later then I’d been expecting. By about an hour and a half. I had been planning the switch to the oven for right when I left the house, but it ended up almost completely finished before she even called me for a pickup. So I made sure there was enough liquid and that the heat was just high enough to keep a low bubbly simmer but low enough to not dry out or misbehave while I was out of the house.

Finished dish of tomatoes that have turned orange from braising in the tomato sauce and small chunks of tomato and pepper in a saucy base.

We came back in the house, and the smell was amazing! The potatoes were very hot, but that gave us some time to chat while waiting for it to cool.

I still had a little ruqaq (an Arabic thin crepe-like bread) left from an experiment, so we used that as a base layer to soak up the sauce. And we had feta brined white cheese on the side.

A plate made up with the potatoes on top of a layer of soaked flatbread and some white cheese on the side

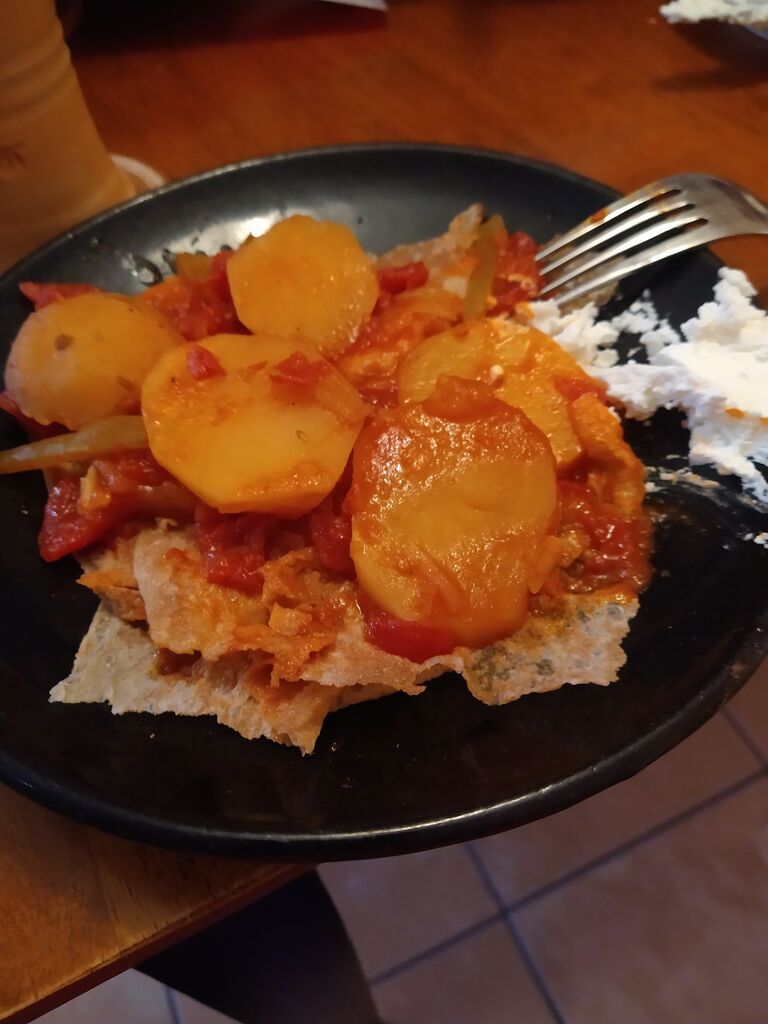
This version ended up amazing! A+ Would make again. The spiced tomato broth flavored the potatoes all the way through, and it was just the right amount of warm and comforting without being too heavy for lunch.


Let’s also do a quick roundup of Egyptian food blogs I found:

Chez Nermine: authored by Nermine Mansour, who was born in Egypt, a former Egyptian diplomat (her husband still seems to be a diplomat), and lives in Virginia (united states). Oldest recipe posted 17 August 2017; most recent recipe 3 April 2026. Primarily Coptic, she has recipes tagged for Christian, Islamic, and Jewish holidays and includes both vegan and meat. Has a recipe for macarona forn, saneyet batates, koshari, and molokhia. Tagline is Raising the Flag of Egyptian Cuisine. Likelihood of using: 10/10 (see above)

TheEgyptianCook: Signature cooking by Muhammed Elgammal, but posts and videos are made by a team and his site has a merchandise store “in development.” He is an Egyptian-American Muslim who resides in the United States. Oldest recipe posted 11 December 2023; most recent recipe 17 November 2025. Has a recipessddd for macarona bechemel, baked potatoes and lamb, koshari, and molokhia, Recipes are fairly meat heavy, but includes vegan kofta (as well as beverages and desserts). Likelihood of using: 1/10 (autoplay videos)

Scarf Gal Food: Simona Afifi does not have a separate “about” section, but does sprinkle anecdotes throughout the posts. Diaspora Egyptian with actual experience making and buying food in Egypt, posting from the united states. Oldest recipe posted 21 April 2015; most recent recipe 13 December 2021. Has a recipe for macarona bechamel, saneyet batates, koshari, and molukhia. Likelihood of using: 6/10 (most likely this recipe for easy ful starting with canned beans)

The Egyptian Kitchen: abissada was 1st generation born outside Egypt and lists her location as France, but she has visited Egypt. Earliest recipe posted 18 January 2010; most recent recipe . Has recipes for macarona bil bechemel, koshari, and molokhia (first posted recipe). Likelihood of using: 3/10

Food of Egypt: References christian and Islamic holidays. Oldest recipe posted 28 July 2010; most recent recipe 1 August 2013 (posted to facebook through August 2015). Has a recipe for molokheya. Likelihood of using: 2/10 (too many intrusive ads)

Cleobuttera: Tasbih is a food blogger in Egypt who specializes in pastry and baking. Oldest recipe posted 11 November 2014; most recent recipe 25 August 2019. Best web design, includes a section of which major publications have referenced her blog. Likelihood of using: 7/10 (would be higher if I were more of a baker/confectioner)

JulienJulia: Julia is a cooking nom de plume for Kariman Al Essawy, a home cook in Egypt. Oldest recipe posted 22 April 2010; most recent recipe 26 June 2017. Includes restaurant reviews. Has recipes for bechamel lasagna, koshari and molokhia. Also includes this write up of cookbook author Nazeera Nicola. Likelihood of using: 5/10

see also: History of Egyptian Cookbooks and Ask Abla Nazira

Experimenting with Pickled Peppers

If you’ve ever grown peppers, you know they can be quite prolific.

I usually grow at least once variety I can dry, but I’ll admit that I still haven’t used all of my dried peppers from last year. Or the year before that.

Growing purple peppers in a pot on my porch

These purple peppers were not a variety I was familiar with, but they rounded out an order to get free shipping from one of the Etsy stores I but small plants from (yes it sounds like a weird source for plants, but it has worked surprisingly well the last couple years). The listing called them a Buena Mulata pepper and I did not look them up before buying.

The fruits have been delicious and I love them on sandwiches or with eggs. There’s a zing of spiciness, a hint of fruitiness, and a medium amount of meatiness. And a lot of them! This is just from one single plant, two harvests about a week apart.

I just looked them up for this post, and it looks like if I leave them longer they will turn red and dry well. So that’s probably what I do for the rest of their season.

A pint jar of purple peppers being pickled (by means of fermentation)

For this experiment, I boiled the pint jar, a jar weight, a fermentation lid, and the ring to hold8 the lid on.

Once I pulled the jar out and let it cool a bit, and I started off with two fresh bay leaves and two pinches of Egyptian cumin.

I washed the peppers and peeled off their stems without cutting into the skin. I also peeled about 4 cloves of garlic.

Then I wedged the peppers in as tightly as I could with the garlic cloves popped in randomly as I went.

This time I weighed my water and tried to get 4% salinity, since I might a well try a more proper pickle. I also added a little sugar because I find sugar pairs well with spicy, and I’d read that too strong capsaicin can inhibit fermentation, so I figured a little extra food wouldn’t hurt.

We’ll see!

Update Sunday 3 August 2025: the peppers are fermenting and have lost some of their color.

I have not yet tasted the peppers.

3 jars of pickles. In back is a half gallon jar of cucumber pickles. The middle one is a 20 ounce jar of spicy green and banana peppers. In front is the pint jar of purple peppers.

But I did start a whole other batch of peppers pickling! This new batch used some of the brine from the cucumber pickles as the start.

The new batch also had fresh bay leaves and brown mustard seeds as seasoning, but I also added some fresh sage. This was a mix of all the other peppers, so some banana peppers, a lot of Korean gochugaru style (still green) peppers… And a third one which might also be the Korean peppers or might be something else

Experimenting with pickles

I know everyone else has already gotten excited about fermentation pickling and I am slow. But I’ve now got an abundance of cucumbers coming out of my garden, and it’s too many to just quick pickle.

I only took a picture of the assembled jar and none of the process of assembling it. Maybe more pictures later as it ferments. Right now the half dozen cucumbers in a large jar are bright green and packed tightly. – Sunday 28 July 2025

So I started off looking for a recipe that wasn’t all about the dill (because it’s not my favorite flavor – it’s fine, but if there’s a choice I’d like to pick other things). I ended up on this blog – https://www.blessthismessplease.com/easy-fermented-pickles/ (site has medium intrusive advertising) which seemed like it prioritized good advice over a specific recipe. The one thing I’ve read other places that it did not mention was trimming the blossom end of the cucumber to reduce softening. Is that advice only relevant to vinegar pickles? I went ahead and trimmed the tips while washing them.

I got half gallon jars this year just for canning. They don’t fit anywhere in my shelves, so I’m going to have to fill them all up with pickling this Summer I guess. *goals*

My largest dutch oven is an oval, so ikt will fit the half gallon jar for boiling and sterilizing – I put a hand towel on the bottom to cushion the glass. I also boiled a glass weight and a burping kid that fits wide mouth canning jars at the same time.

After I pulled the jar, I decided to let it cool. Unlike water bath canning, there was no direction to heat up the brine at all, and I guess that might kill the bacteria we want. So if everything going into the jar will be room temperature or cooler then the jar should also be room temperature.

The instructions say to add something like bay leaves (ideally fresh) for the tannins (and flavor), so I did. Then I added a mix of coriander seeds (from last year’s garden), brown mustard seeds, and a few nigella sativa seeds. Oh! And two bay berries!

Then I stuffed about half a dozen cucumbers inside – the middle one poked up a bit and there was still a lot of headspace, so I cut up the last cucumber into chunks – so I’ll get to find out how both cut and whole cucumbers work.

Only then did I remember the garlic cloves I had peeled, so those got squeezed in wherever they would fit.

I used 1 sixteen ounce bottle of water with some salt added as would fit in the freshly opened bottle. That filled the jar about 3/4 of the way up. I did not measure the cucumbers or the salt. And I was a little worried it wasn’t quite salty enough, so I refilled the water bottle halfway with tap water I had already boiled (and let cool) with a slightly higher concentration of salt to top things off.

The instructions said to top with either a weight or a cabbage or grape leaf in order to keep the cucumbers submerged. So I figured why not both! 

And then I put on the burping lid and have set it on the corner of my kitchen counter that’s not next to the stove or the dishwasher. It doesn’t really get dark there, so I threw a kitchen towel over it.

Now for waiting and seeing what happens!

Edit Monday 29 July 2025: I think it’s looking like a healthy start to this pickle

The green color of the cucumbers has started to dull. Some of the spices are floating. The edge of the cabbage leaf still looks somewhat crisp. The water is slightly cloudy, but not bad

Edit Sunday 3 August 2025: I’ve opened the jar and used done of the brine to start my next batch of pickled peppers.

I tasted one of the cut sections of cucumber that I used to fill in the top, and it tastes like a pickle! Crisp and tangy! I also ate the cabbage leaf I had stuck in the top.

Week old cucumber pickles

The liquid is definitely cloudy, which is what was foretold as the result of using iodized salt. Cloudy picking liquid is more disappointing than I thought it would be, so I guess I’ll be sticking with plain salts in the future.

There is no mold and there’s no yeast film at the top, either. Everything smells and tastes good.

I am also disappointed in these fermentation lids – they do have enough flexibility to bulge with fermentation gases, but the lids are not self burping as promised. I keep having to loosen the rings to let gas out.

I could probably move them to the refrigerator now, but I’m more excited about the experiment than about pickles, so I’m going to keep them going and see what happens.

I boiled the jar weight before putting it back into the jar.

Kimchi fried rice with spam

Kimchi fried rice with spam and am egg on top!

Okay, not spam. But I’ve been watching a lot of spam appreciation posts, so I decided to try some. But I bought the cheap knockoff version from Aldi’s

Cooking the luncheon meat

I cubed it and fried it. And decided that was too much, so I also pulled about a third of the cooked meat out and refrigerated it for future omelets and quesadillas. I also tasted it, and it mostly tasted like nothing – hot smooth fatty nothing. So I will have to retry with the actual name brand product.

I think cooked some diced onion and carrot in the rendered fat.And then added a pint container of leftover chinese takeout white rice, with all of the clumps worked out. I also have canned shelf stable kimchi because it’s not something I go through fast enough to not waste kimchi with live fermentation. But that also meant I knew it would be mild, so I added a healthy spoonful of gochujang. (Also I drained the liquid off, cut up and added the cabbage first, and then added the gochujang and kimchi liquid – and a teaspoon of soy sauce – toward the end)

With rice and kimchi in the skillet

And then added a pint container of leftover chinese takeout white rice, with all of the clumps worked out. I also have canned shelf stable kimchi because it’s not something I go through fast enough to not waste kimchi with live fermentation. But that also meant I knew it would be mild, so I added a healthy spoonful of gochujang. (Also I drained the liquid off, cut up and added the cabbage first, and then added the gochujang and kimchi liquid – and a teaspoon of soy sauce – toward the end)

and then I fried an egg and put it on top!

Beets & Candles

Beet Shred

After a long week of several friends visiting and going out to fancy restaurants and eating rich food, it’s a relief to have a pickled salad hanging out in my refrigerator waiting for me.

I call this my beet shred (it has been on this blog before), but what started as misreading/misremembering a recipe is pretty much a simple salad of all the purple things together at once.

Shredded purple cabbage, thinly sliced purple onions, sliced raw beets, and some red wine vinegar.

It’s great as a taco topping or fancy side salad with a vivid presentation. But it’s also just comforting to eat on it’s own (or over rice).


Menorah with a blue and a white candle

Tonight I lit candles for the first night of Hanukkah. The last two years I’ve been using the fancy menorah of my childhood, but I’ve also been missing this small one made out of gears (which move!) that I picked out and bought for myself when I established a household of my own.